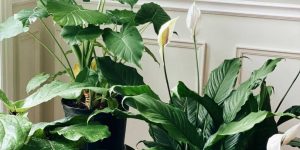
It’s a tale as old as time for plant parents: we love our green companions so much, we sometimes love them a little too much. The desire to nurture and care for them can often lead to the most common plant killer of all – overwatering. Before you resign yourself to a plant-less future, take heart! Many overwatered indoor plants can be brought back from the brink.
This comprehensive guide will walk you through the signs of overwatering, immediate rescue missions, long-term recovery strategies, and crucial preventative measures to ensure your leafy friends thrive.
The Silent Killers: Recognizing the Signs of Overwatering
Unlike underwatering, which often presents with dramatic wilting, overwatering can be more insidious. Its symptoms can sometimes mimic other issues, making diagnosis tricky. However, here are the tell-tale signs that your plant is suffering from too much love:
- Wilting or Drooping Leaves, Despite Wet Soil: This is often the most confusing symptom. While wilting usually signifies a lack of water, if the soil is consistently damp or soggy, it points to root suffocation. The roots are unable to absorb water and nutrients because they’re drowning, leading to the same visual effect as thirst.
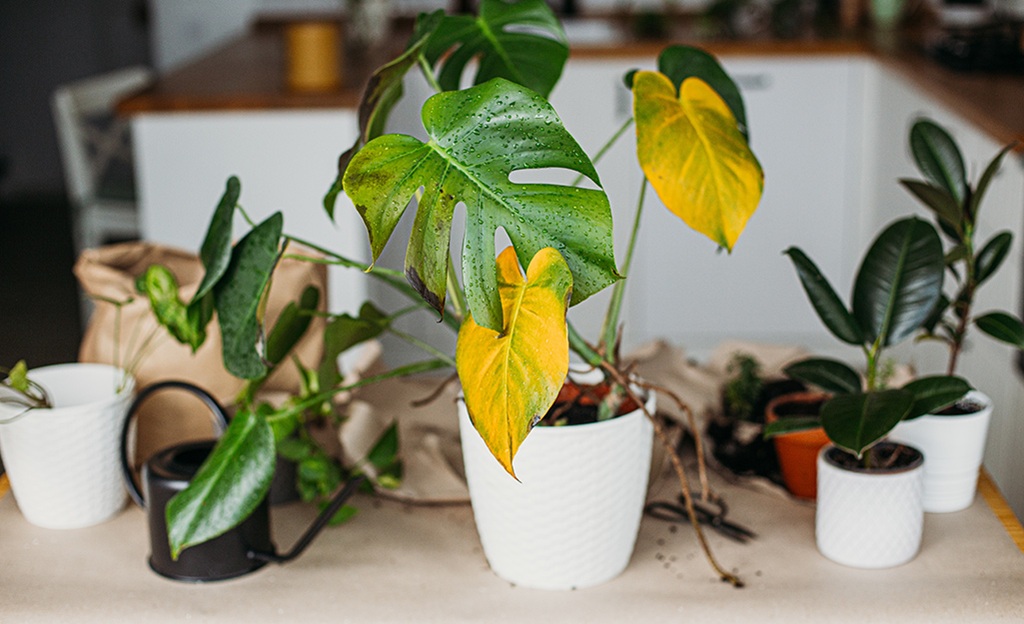
- Yellowing Leaves (Often Starting from the Bottom): Excess water washes away essential nutrients and can also damage the root system, preventing proper nutrient uptake. Leaves, particularly older ones, will turn yellow and may eventually drop off.
- Mushy or Soft Stems/Bases: A healthy plant should have firm stems. If the base of the plant or the stems feel soft, squishy, or even appear discolored (brown or black), it’s a strong indicator of root rot spreading upwards.
- Moldy or Foul-Smelling Soil: Stagnant, waterlogged soil is a breeding ground for mold, fungi, and anaerobic bacteria. You might see a white or green fuzzy layer on the soil surface, or a distinctly unpleasant, musty odor emanating from the pot.
- Stunted Growth or Lack of New Growth: An overwatered plant is struggling to survive, let alone thrive. New growth will be absent or appear weak and discolored.
- Edema: This appears as small, blister-like growths or bumps on the leaves, often on the underside. It’s caused by cells bursting due to excessive water pressure.
- Root Rot (The Most Critical Sign): While you can’t always see this directly, it’s the primary consequence of overwatering. If you suspect overwatering, gently tip the plant out of its pot and inspect the roots. Healthy roots are typically firm, white or tan, and have a fresh, earthy smell. Rotted roots will be brown, black, mushy, slimy, and emit a foul, decaying odor.
Immediate Emergency Rescue: The First Steps to Revival
Once you’ve identified the signs of overwatering, quick action is crucial to prevent further damage.
- Stop Watering Immediately: This might seem obvious, but it’s the most important first step. Do not water the plant again until the top few inches of soil are completely dry.
- Improve Drainage:
- Empty the Saucer: If your pot sits in a saucer, make sure it’s completely empty of standing water. Leaving water in the saucer can lead to the plant reabsorbing excess moisture and creating a perpetually waterlogged environment.
- Elevate the Pot: Place the pot on “pot feet” or a few pebbles in the saucer to allow for better airflow around the drainage holes. This prevents the pot from sitting directly in any drained water.
- Assess the Soil:
- Tip the Plant Out: Carefully slide the plant out of its pot. This allows you to assess the soil moisture throughout the root ball.
- Remove Excess Wet Soil: If the soil is soaking wet and heavy, gently remove as much of the saturated soil as possible, particularly from the bottom of the root ball. Be careful not to damage healthy roots.
- Increase Air Circulation:
- Move to a Brighter, Airier Location: Place the plant in a spot with good air circulation, but avoid direct drafts that could stress it further. Increased airflow helps the soil dry out faster.
- Consider a Fan (Carefully): For very severe cases, you can use a small fan on a low setting, pointed away from the plant, to gently circulate air and aid in drying. Ensure the fan isn’t blowing directly on the plant, as this can cause dehydration of the foliage.
Related: Best Apartment Plant: Low-Maintenance, Air-Purifying Indoor Greenery Guide
The Next Phase: Dealing with Root Rot
If you’ve identified root rot during your inspection, this step is critical for the plant’s survival.
- Trim Away Rotted Roots: Using clean, sharp scissors or pruning shears, carefully cut away any roots that are brown, black, mushy, slimy, or foul-smelling. Cut back to healthy, firm tissue.
- Rinse the Remaining Roots: Gently rinse the remaining healthy roots under cool, running water to remove any clinging diseased soil or fungal spores.
- Consider a Fungicide (Optional): For severe cases, you can dip the remaining roots in a dilute solution of a general-purpose houseplant fungicide, following the product’s instructions. This can help prevent further fungal growth.
- Repot with Fresh, Well-Draining Soil:
- Clean the Pot: If you’re reusing the same pot, thoroughly clean and sanitize it with a bleach solution (1 part bleach to 9 parts water) to kill any lingering pathogens. Rinse well.
- Choose the Right Soil: Use a fresh, well-draining potting mix. Look for mixes specifically formulated for indoor plants that contain perlite, vermiculite, or sand to improve drainage. Avoid heavy, dense soils.
- Repotting: Place a layer of fresh potting mix at the bottom of the clean pot. Carefully position the plant, spreading out its roots, and backfill with more fresh soil, gently firming it around the base. Leave about an inch of space from the rim for watering.
- No Immediate Watering: Do not water the plant immediately after repotting. Allow it a few days to recover from the shock and for any minor root damage to heal. This gives the roots a chance to “breathe” and dry out further.
Post-Rescue Care: Nurturing Your Plant Back to Health
Even after the immediate rescue, your plant will need special attention to fully recover.
- Patience is Key: Plant recovery takes time. Don’t expect an overnight miracle. It can take weeks or even months for your plant to show significant signs of improvement.
- Water Sparingly and Correctly:
- The Finger Test: Before watering, stick your finger about 2-3 inches into the soil. Only water if it feels dry at that depth.
- Bottom Watering (Optional but Recommended): For many plants, bottom watering can be beneficial. Place the potted plant in a tray of water and allow it to soak up water from the bottom drainage holes for 20-30 minutes, or until the top of the soil feels slightly damp. Remove and let it drain completely.
- Consistent, Not Constant, Moisture: Most plants prefer consistent moisture, but not constant saturation. Allow the topsoil to dry out between waterings.
- Provide Adequate Light: While recovering, ensure your plant is receiving appropriate light for its species. Avoid direct, scorching sunlight if it’s not a high-light plant, but a well-lit spot is generally beneficial.
- Hold Off on Fertilizing: Do not fertilize an overwatered plant. Its damaged root system cannot effectively absorb nutrients, and fertilizer salts can further burn the roots. Wait until the plant shows clear signs of new, healthy growth before resuming a diluted fertilization schedule.
- Monitor for Pests/Diseases: Stressed plants are more susceptible to pests and diseases. Regularly inspect your plant for any signs of infestations (spider mites, aphids, fungus gnats) or further fungal issues.
Prevention is Better Than Cure: Avoiding Future Overwatering
The best way to deal with overwatering is to prevent it from happening in the first place. Here are essential tips for proper watering:
- Know Your Plant’s Needs: Different plants have different watering requirements. A succulent will need far less water than a fern. Research your specific plant’s needs.
- Check the Soil, Not Just the Calendar: Don’t water on a strict schedule. Instead, water based on the soil’s moisture level.
- Use Pots with Drainage Holes: This is non-negotiable. Without drainage, water has nowhere to go, leading to guaranteed root rot.
- Choose the Right Pot Size: Avoid potting a small plant in a massive pot. Excess soil will hold too much moisture, increasing the risk of overwatering.
- Potting Mix Matters: Invest in a good quality, well-draining potting mix. You can also amend standard potting mix with perlite or coarse sand to improve drainage.
- Avoid Saucers with Standing Water: Always empty excess water from saucers within 30 minutes of watering.
- Consider a Moisture Meter: These inexpensive tools can provide an accurate reading of soil moisture at various depths, taking the guesswork out of watering.
- Water Thoroughly When You Do Water: When you water, water until you see water draining from the bottom. This ensures the entire root ball gets hydrated. Then, allow it to drain completely.
Related: 12 Easy Steps to Grow Your Own Flavorful Bubble Gum Plant at Home
Conclusion
Overwatering is a common mistake, but it doesn’t have to be a death sentence for your beloved indoor plants. By understanding the signs, acting quickly, and providing consistent, mindful care, you can successfully revive your struggling green companions. Remember, every plant parent makes mistakes, but the journey of learning and adapting is what makes the green thumb grow. With a little patience and the right approach, your overwatered plants can bounce back, thriving once again and bringing joy to your indoor oasis.