Many don’t know when to transplant seedlings. Here, we will discuss the question. The vegetables that grow from a transplanted seedling allow you to advance your harvest and reduce planting time in the open field. Also, by sowing directly in the nursery and take care of the greenhouse process protects the plant from natural stress, pathogens, and pests.
When to transplant seedlings?
The transplant seedling needed when the seedling completes the necessary development cycle to be able to continue its life cycle in the definitive land of cultivation. You may follow the 7 ideas to decorate the garden.

One week before the transplant, it is recommended to subject the seedling to a process of tissue hardening. This is achieved by reducing irrigation for the plant to suffer a loss of moisture and then harden its tissues to make them more resistant to the conditions they will have in the field. A seedling with high humidity appears with very watery and weak roots, while one that has a moisture deficiency has thick, woody roots.
Three or four days before the transplant, a solution rich in phosphorus can be applied to the plants, with a mixture consisting of a base of 6 grams of ammonium phosphate for each liter of water. The measure is between 4 to 6 liters per square meter.
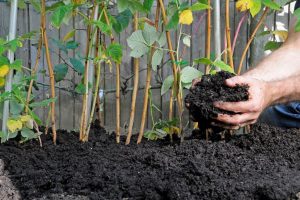
Also, you have to leave the land ready to receive the seedlings. You must ensure that the soil has good drainage and is free of weeds and pests that could damage the seedling.
How can a seedling be ready for transplant?
If your seedling has at least three leaves and is healthy and vigorous, with a sound root system and a height of about 15 centimeters, it is ready for transplant.
There are two types of transplants, the one of root washed, without earth around. It is needed when an earthy layer covers the roots. The first can be applied to the tomato, chili, onion, and broccoli seedlings because they can recover from the partial loss of roots during the transplant process. However, melon, watermelon, and cucumber have to be only by the root ball.
Time of transplant
The transplant must be done in the early morning hours or the late afternoon. To take advantage of the coolest moments of the day. The soil has to be soft and moist so that the root of the seedling develops more easily and quickly.
In addition, two or three hours before the transplant, you must water the seedbed to facilitate the extraction of the seedling without damaging the roots and reaching the field with sufficient humidity. Avoid transplanting the seedlings that are purple, as this means that they lack phosphorus.
How to transplant a seedling?

Changing from pots to seedlings seems very simple, but in reality, it is not so much. You have to think that the transplant is something unnatural for them. Because from the moment the seeds germinate until their end arrives, they remain in the same place day after day. Then, when changing them from a container, they are forced to spend energy that, in their natural habitat or if they were planted in the garden, they would not need to do.
Therefore, transplantation is a change that, if not done well, can weaken them much, to such an extent that they could go to waste forever, without remedy. To avoid this, it is highly recommended to follow this step by step in which we explain how to transplant a seedling:
Choose the flowerpot
It is, perhaps, one of the most important things and to which we must pay more attention when it comes to knowing how to transplant a seedling. A too narrow pot will not help, but one that is too wide either, since the seedling could suffer from excessive watering. How to know then which one to choose? Looking at the seedling itself and how it is developing. To have more or less an idea, I can tell you that:
Plants that are going to be extensive (palms, trees, bamboos, etc.) need a container that is always at least 4cm wider and deeper.
Bulbous, herbaceous and similar can be planted without problems in pots that are much wider than deep.
Cactus, succulents and the like will depend on the species in question, but usually, they need a pot that is about 2-3cm more full than the previous one.
The bonsai have to be planted in trays destined for them, wide enough so that their root system can fit well.
Plastic or mud? That is an excellent question. As they are two very different materials, let’s see what the advantages and disadvantages of each type are:
Plastic Pots
Pros: They are very economical, lightweight and, therefore, easy to transport or change places.
Disadvantages: Over time, the sun’s rays weaken the material, causing it to break. Also, if you live in an area where the summer is sweltering, it overheats a lot, which can endanger the roots. Another critical issue is that it is not porous, so your root system will have many problems to root well.
Clay Pots
Pros: It allows the roots to develop correctly, and they are very resistant. They are also very ornamental and have the right weight to withstand the wind better than plastic pots.
Disadvantages: Its price is higher, and breaks easily when falling to the ground.

Substrate for seedlings
Once we have chosen the pot, it is necessary to prepare the substrate. As there are many types of seedlings and each of them has its own needs, we recommend reading this guide so you know what mixture you should put in your seedling. As soon as we have the land ready, we will fill the container with it, up to a little less than half.
Extraction of the seedling
Now comes the most delicate part: remove the seedling from its old pot. As we have said, we must be cautious so that the root ball (ground bread) does not fall apart. It will have more difficulties in overcoming the transplant. To make https://naturallydaily.com/buy-accutane-online/ it easier and minimize the risk of problems arising, we will water thoroughly, soaking all the substrate.
Then, we will give some blows to the pot to try to get the soil to “take off” from it. We will take the seedling by the base of the trunk or main stem, and we will pull it upwards. It should come out quickly, but if it did not, or if we see that it has roots outside the pot, what we will do is cut the container with scissors.
Finally, take into account the distance between beds and enter plants so that the roots can grow properly.